Cloning a Pdb with Different Character set into your CDB

Introduction.

The below scenario will be discussed in this post: There is container database that has been created with an utf8 Character Set (and this character set comes recommended in OCI). This Container Db (and its only PDB (of course also in utf8) has an active data guard already in place in OCI.

Scenario requested: Can we add – create a PDB with a different Character set into this CDB with that other Character set.

Short story: No you cannot create a pluggable database in the CDB with a different Character Set. Plan your CDB with care.

Long story:  You cannot, but there is a work around possible but your target CDB (the database where you would like to add that different Character set needs to be UTF8 to make this work!) 

AND

You need a second Container Database with a different Character set in OCI.

Recommendations / Setup / Tested practice:

In OCI: before implementing a data guard on your CDB, it is recommended to implement all the needed PDBs (best practice via the OCI console) in the CDB before setting up a data guard. Which means IF you really really really want to do this scenario below, do it before setting up the Dataguard.

Second recommendation if you need to add PDBs in the container database ( with utf8)  still recommend to add  or clone first all the PDBs needed in that CDB before starting to work on the (active) data guard.

Should you need a container database with a different Character Set  and need to load data into it which also holds that different character set ,  then set up this environment and perform the remote clone steps as mentioned here (below)  and make sure the PDB  is in a good status on the Prim side before continue with cloning scenario.

Please be aware that a lot of things happen for a reason. If you really really really ( did i mention really) have to have environments with other characterset ( different from UTF8) do consider to implement a separate CDB – infrastructure with that different character set!

And most and most importantly order of using tools should be: UI, then the db cli and only as last resort use manual intervention using ssh – sqlplus etc.

Requirements / best practice that need checking before Cloning:

  • My source CDB database (in UTF8) is holding a PDB and I want to add a PDB In a different Character set to my primary side in the existing CDB:
  • Source (remote pluggable database) in CDB with different Character set is set to read only.
  • Is there a data guard set up in place in OCI? If your answer to that question is Yes: check with dgmgrl that the Data Guard = Happy.
  • Do you have enough storage on disk groups to hold a transient PDB, and a clone PDB from transient in same Container Database?
  • Is there a database Link in place for the remote clone.
  • Check source (in a container database with different character set) as a preparation but for the first clone) :

SQL> show PDBs

    CON_ID CON_NAME                       OPEN MODE  RESTRICTED

———- —————————— ———- ———-

         2 PDB$SEED                       READ ONLY  NO

         3 ISOP15_PDB1                    READ WRITE NO

         4 TEST                           READ ONLY  NO

         5 WILLIE                         READ WRITE NO

  • Check character set in that Source PDB:

SELECT value FROM nls_database_parameters WHERE parameter = ‘NLS_CHARACTER SET’;

VALUE

—————————————————————-

WE8ISO8859P15

  • Check for Data Guard (if in place) in place (and happy)

Note:  by default in OCI broker is running on the Prim side.

dgmgrl

DGMGRL> connect sys / as sysdba                                                                                                  

Password:                                                                                                                         

Connected to “DBUTF8_fra2ps”                                                                                                     

Connected as SYSDBA.                                                                                                              

DGMGRL> show configuration                                                                                                       

Configuration – DBUTF8_fra2ps_DBUTF8_fra1h7                                                                                      

  Protection Mode: MaxPerformance                                                                                                

  Members:                                                                                                                        

  DBUTF8_fra2ps – Primary database                                                                                               

    DBUTF8_fra1h7 – Physical standby database                                                                                     

Fast-Start Failover:  Disabled                                                                                                    

Configuration Status:                                                                                                             

SUCCESS   (status updated 59 seconds ago) 

  • Checked for storage:

Specific script for Asm environment:

SET LINESIZE 150

SET PAGESIZE 9999

SET VERIFY off

COLUMN group_name FORMAT a25 HEAD ‘DISKGROUP_NAME’

COLUMN state FORMAT a11 HEAD ‘STATE’

COLUMN type FORMAT a6 HEAD ‘TYPE’

COLUMN total_mb FORMAT 999,999,999 HEAD ‘TOTAL SIZE(GB)’

COLUMN free_mb FORMAT 999,999,999 HEAD ‘FREE SIZE (GB)’

COLUMN used_mb FORMAT 999,999,999 HEAD ‘USED SIZE (GB)’

COLUMN pct_used FORMAT 999.99 HEAD ‘PERCENTAGE USED’

SELECT distinct name group_name , state state , type type ,

round(total_mb/1024) TOTAL_GB , round(free_mb/1024) free_gb ,

round((total_mb – free_mb) / 1024) used_gb ,

round((1- (free_mb / total_mb))*100, 2) pct_used

from v$asm_diskgroup

–where round((1- (free_mb / total_mb))*100, 2) > 90

ORDER BY name;

  • On prim side check for specific database link

set lines 300

select owner,DB_LINK from dba_db_links order by 1 ;

OWNER                                                                                                                            DB_LINK

——————————————————————————————————————————– ——————————————————————————————————————————–

PUBLIC                                                                                                                           dblink_to_other_CDB.SUB10200805271.MBK1.ORACLEVCN.COM

SYS                                                                                                                              SYS_HUB

  • If the  database link test is not in place it needs create (As you can see I decided to do a public db link and also decided to add all the details in the db link and not use tnsnames entry):

CREATE public DATABASE LINK dblink_to_other_CDB

CONNECT TO <C##POWERUSER> IDENTIFIED BY <USER_PASSWORD>

USING ‘(DESCRIPTION=(CONNECT_TIMEOUT=5)(TRANSPORT_CONNECT_TIMEOUT=3)(RETRY_COUNT=3)(ADDRESS_LIST=(LOAD_BALANCE=on)(ADDRESS=(PROTOCOL=TCP)(HOST=10.0.1.179)(PORT=1521)))(CONNECT_DATA=(SERVICE_NAME=test.sub10200805271.mbk1.oraclevcn.com)))’;

  • On the Prim side check for  parameter for GLOBAL first,  if you do not really need it put it to False!

SQL> show parameter global

NAME                                 TYPE        VALUE

———————————— ———– ——————————

allow_global_dblinks                 boolean     FALSE

global_names                      boolean    FALSE <<<—-

global_txn_processes                 integer     1

  • if global_names is true change it to false.

alter system set  global_names = FALSE ;

  • After that check that the db link is working on prim side and  SB side:

SQL> select sysdate from dual@dblink_to_other_CDB;

SYSDATE

———

19-NOV-21

  • On the prim side create an intermedia PDB (clone from the remote container) (with a PDB in diff character set). This step will create a pluggable dabase in our CBD with the character set  from the Other  CDB  (if that CDB was we8iso8859p15 and its PDB there will be we8iso8859p15 too). PDBVOID will be a pluggable database with character set  we8iso8859p15 which is part of  the CDB where character Set is UTF8.

create pluggable database PDBVOID from test@test keystore identified by “<wallet_password>” standbys=none;

Explanation:

test@dblink_to_other_CDB means:  PDBname_to_clone_from dblink_to_other_CDB: dblink we created earlier to the CDB holding PDB (in a different Character set)

standbys means do not protect this PDB in the Data Guard.

  • Next step will be to create a self-referencing DB link on primary (here named DBLINK_TO_PRIM) ( so basically a  dblink that is pointing to the database where it is also created).
  • Note it will be replicated on standby pointing to the primary too) and I DO recommend you test that DB link on  both sides ( Primary and Standby) if it works well.

CREATE public DATABASE LINK PRIMSIDE

   CONNECT TO C##SYSTEM IDENTIFIED BY HAS_BEEN_CHANGED_##12

   USING ‘(DESCRIPTION=(CONNECT_TIMEOUT=5)(TRANSPORT_CONNECT_TIMEOUT=3)(RETRY_COUNT=3)(ADDRESS_LIST=(LOAD_BALANCE=on)(ADDRESS=(PROTOCOL=TCP)(HOST=10.0.1.39)(PORT=1521)))(CONNECT_DATA=(SERVICE_NAME=DBUTF8_fra2ps.sub10200805271.mbk1.oraclevcn.com)))’;

  • Next step to be taken is happening on the Standby side: You will have to set – update the parameter: STANDBY_PDB_SOURCE_FILE_DBLINK:

ALTER SYSTEM SET STANDBY_PDB_SOURCE_FILE_DBLINK=’PRIMSIDE’;

  • Next Step on prim side prepare  for the next clone (inside the container) and that clone from a clone will be there to stay.

SQL> alter pluggable database PDBVOID open instances = all;

SQL> alter pluggable database PDBVOID  close instances = all;

SQL> alter pluggable database PDBVOID open read only instances = all;

SQL> show PDBs

    CON_ID CON_NAME                       OPEN MODE  RESTRICTED

———- —————————— ———- ———-

         2 PDB$SEED                       READ ONLY  NO

         3 PDB1                           READ WRITE NO

         4 PDBDEC                         READ WRITE NO

         5 PDB2                           READ WRITE NO

         6 PDB010                         READ WRITE NO

         7 PDBP15                         READ WRITE NO

         8 PDBVOID                        READ ONLY  NO

  • Now create a local clone from the transient no-standby PDB with STANDBYS=ALL  (which means the Data Guard should protect this New PDB).

create pluggable database PDBP15C from PDBVOID keystore identified by “WElcome##12” STANDBYS=ALL ;

SQL> show PDBs                       

    CON_ID CON_NAME                       OPEN MODE  RESTRICTED

———- —————————— ———- ———-

         2 PDB$SEED                       READ ONLY  NO

         3 PDB1                           READ WRITE NO

         4 PDBDEC                         READ WRITE NO

         5 PDB2                           READ WRITE NO

         6 PDB010                         READ WRITE NO

         7 PDBP15                         READ WRITE NO

         8 PDBVOID                        READ ONLY  NO

         9 PDBP15C                        MOUNTED

  • Open the PDB on primary side:

SQL> alter pluggable database PDBP15C  open instances = all;

  • Time to check wallet on prim side:

col wrl_parameter format a60

set lines 300

select con_id, wrl_parameter, status, wallet_type, keystore_mode from v$encryption_wallet;

  • Create a new TDE master encryption key on the primary side.

alter session set container=PDBP15C;

administer key management set key force keystore identified by “WElcome##12” with backup;

  • Note the broker of the Data Guard will not be happy it will show error due to the new master key implemented on the PRIM SIDE !!!!!!!!!!!!!!!!!!!!!:

DGMGRL> show configuration

Configuration – DBUTF8_fra2ps_DBUTF8_fra1h7

  Protection Mode: MaxPerformance

  Members:

  DBUTF8_fra2ps – Primary database

    DBUTF8_fra1h7 – Physical standby database

      Error: ORA-16766: Redo Apply is stopped

Fast-Start Failover:  Disabled

Configuration Status:

ERROR   (status updated 60 seconds ago)

  • On prim side .. start preps for  scp of the wallet to the standby machine(s).

cd /opt/oracle/dcs/commonstore/wallets/tde/DBUTF8_fra2ps/

[oracle@clutf81 DBUTF8_fra2ps]$ cp ewallet.p12 cwallet.sso /tmp

[oracle@clutf81 DBUTF8_fra2ps]$ cd /tmp

[oracle@clutf81 tmp]$ ls -ltr ewallet.p12 cwallet.sso

-rw——- 1 oracle oinstall 14091 Nov 19 12:33 ewallet.p12

-rw——- 1 oracle oinstall 14136 Nov 19 12:33 cwallet.sso

## Permissions needed for OPC:

chmod o+rx  ewallet.p12  cwallet.sso

[opc@clutf81 tmp]$ scp ewallet.p12  cwallet.sso 10.0.1.62:/tmp

ewallet.p12                                                                                                                                              100%   14KB  10.4MB/s   00:00   

cwallet.sso                                                                                                          

  • On the Standy side start your preparations by saving the wallet. And copy  the wallet from the primary side to the wallet location on the Standby Side.

cd /opt/oracle/dcs/commonstore/wallets/tde/*/

[oracle@mysbfra1 DBUTF8_fra1h7]$ cp ewallet.p12 ewallet.p12.save

[oracle@mysbfra1 DBUTF8_fra1h7]$ cp cwallet.sso cwallet.sso.save

[oracle@mysbfra1 DBUTF8_fra1h7]$ cp /tmp/ewallet.p12 .

[oracle@mysbfra1 DBUTF8_fra1h7]$ cp /tmp/cwallet.sso .

  • On Standby Side close the wallet ( it will reopen with the query in the next bullit):

SQL> alter session set container = CDB$ROOT;

SQL> administer key management set keystore close container=ALL;

  • On Standby side check , ( and this will also open the keystore again).

col wrl_parameter format a60

set lines 300

select con_id, wrl_parameter, status, wallet_type, keystore_mode from v$encryption_wallet;

  • Now it is time to check status in broker again.

DGMGRL> show configuration

Configuration – DBUTF8_fra2ps_DBUTF8_fra1h7

  Protection Mode: MaxPerformance

  Members:

  DBUTF8_fra2ps – Primary database

    DBUTF8_fra1h7 – Physical standby database

      Error: ORA-16766: Redo Apply is stopped

Fast-Start Failover:  Disabled

Configuration Status:

ERROR   (status updated 60 seconds ago)

DGMGRL> show configuration

Configuration – DBUTF8_fra2ps_DBUTF8_fra1h7

  Protection Mode: MaxPerformance

  Members:

  DBUTF8_fra2ps – Primary database

    DBUTF8_fra1h7 – Physical standby database

      Error: ORA-16810: multiple errors or warnings detected for the member

Fast-Start Failover:  Disabled

Configuration Status:

ERROR   (status updated 51 seconds ago)

  • In the broker enable apply again and give it some time !!! ( in my case various minutes).

edit database DBUTF8_fra1h7 set state=’apply-on’;

## check broker:

DGMGRL> show configuration

DGMGRL> show database DBUTF8_fra1h7

Database – DBUTF8_fra1h7

  Role:               PHYSICAL STANDBY

  Intended State:     APPLY-ON

  Transport Lag:      0 seconds (computed 1 second ago)

  Apply Lag:          0 seconds (computed 1 second ago)

  Average Apply Rate: 3.88 MByte/s

  Real Time Query:    ON

  Instance(s):

    DBUTF81

    DBUTF82 (apply instance)

Database Status:

SUCCESS

DGMGRL> show configuration

Configuration – DBUTF8_fra2ps_DBUTF8_fra1h7

  Protection Mode: MaxPerformance

  Members:

  DBUTF8_fra2ps – Primary database

    DBUTF8_fra1h7 – Physical standby database

Fast-Start Failover:  Disabled

Configuration Status:

SUCCESS   (status updated 66 seconds ago)

 Well that is  Relieve.   Data Guard configuration – Broker are happy again (which also means so is this Dba),

  • This can also be checked in sqlplus on SB side

SQL> Set lines 300

Col value format a25

select * from v$Data Guard_stats;

SOURCE_DBID SOURCE_DB_UNIQUE_NAME            NAME                                               VALUE                     UNIT                           TIME_COMPUTED                 DATUM_TIME                          CON_ID

———– ——————————– ————————————————– ————————- —————————— —————————— —————————— ———-

          0                                  transport lag                                      +00 00:00:00              day(2) to second(0) interval   11/19/2021 12:50:42           11/19/2021 12:50:40                      0

          0                                  apply lag                                          +00 00:00:00              day(2) to second(0) interval   11/19/2021 12:50:42           11/19/2021 12:50:40                      0

          0                                  apply finish time                                  +00 00:00:00.000          day(2) to second(3) interval   11/19/2021 12:50:42           0

          0                                  estimated startup time                             24                        second                         11/19/2021 12:50:42           0

  • And good things always come in twice ( another check on the standby side:

SQL> select status,blocks, delay_mins, known_agents from gv$managed_standby where process like ‘MRP%’;

STATUS           BLOCKS DELAY_MINS KNOWN_AGENTS

———— ———- ———- ————

APPLYING_LOG    2097152          0            3

  • Since we are in active Data Guard almost last step in this scenario is to bring the new born PDB  to read only mode.

SQL> show con_name

CON_NAME

——————————

CDB$ROOT

## Last Checks

SQL> show PDBs

    CON_ID CON_NAME                       OPEN MODE  RESTRICTED

———- —————————— ———- ———-

         2 PDB$SEED                       READ ONLY  NO

         3 PDB1                           READ ONLY  NO

         4 PDBDEC                         READ ONLY  NO

         5 PDB2                           READ ONLY  NO

         6 PDB010                         READ ONLY  NO

         7 PDBP15                         READ ONLY  NO

         8 PDBVOID                        MOUNTED

         9 PDBP15C                        MOUNTED

SQL> alter pluggable database PDBP15C open read only instances = all;

Pluggable database altered.

## Check

SQL> alter session set container = PDBP15C;

Session altered.

SQL> SELECT value FROM nls_database_parameters WHERE parameter = ‘NLS_CHARACTER SET’;

VALUE

————————-

WE8ISO8859P15

################################  The End  ##############################

PS Of course it is completely up to you if you want to drop PDBVOID now, or that you will keep it as a template for future scenarios as a kind of Template.

Happy Reading and till we meet again. And of course always  test test test this scenario before you run it on your favorite production environment in a TEST environment.

Mathijs

Oci clone and create Pdbs in Same Container

Introduction.

In the OCI it is best practice that (almost) all activities should be performed  via the Gui. And of course that all happens for very good reasons. This blog will focus on creating  a clone Pdb in same container database when (active) Data Guard is involved. Please be aware that the Ui will not allow you to create another pdb when the Data Guard is active ( the button will be gray).

Setup and recommendation for good practice:

  • There are different scenarios – opinions but when cloning pdb should be read only is my recommendation.
  • In a container if you have multi tenant option in licencings You should  consider using a pdb as a template  for cloning in your db. This will make sure that ALL tablespaces are encrypted. When a pdb is created via Oci ui, than this is always true!
  • Create such “empty” template Pdb before you activate your Data Guard. As always, planning is everything.
  • When creating pdb manually in sqplus be aware of below required steps too:

Preparations:

Check if  your template pdb has all tablspaces encrypted.

select TABLESPACE_NAME , ENCRYPTED from dba_tablespaces;

Make supre that the source pdb = read only.

SQL> alter pluggable database PDB<9> close instances=all;

SQL> alter pluggable database PDB<9> open read only instances=all;

## Checking

SQL> show pdbs

    CON_ID CON_NAME                       OPEN MODE  RESTRICTED

———- —————————— ———- ———-

         2 PDB$SEED                   READ ONLY  NO

         3 PDB1                           READ ONLY  NO

## Create Pdb from  pdb1 ( in same container)

SQL> create pluggable database PDB1C from PDB1 keystore identified by “<Password for keystore>” ;

## Checking

SQL> show pdbs

    CON_ID CON_NAME                       OPEN MODE  RESTRICTED

———- —————————— ———- ———-

         2 PDB$SEED                   READ ONLY  NO

         3 PDB1                           READ ONLY  NO

         4 PDB1C                        MOUNTED

## Open it

SQL> alter pluggable database  PDB1C open instances=all;

## Check

SQL> show pdbs

    CON_ID CON_NAME                       OPEN MODE  RESTRICTED

———- —————————— ———- ———-

         2 PDB$SEED                   READ ONLY  NO

         3 PDB1                           READ ONLY  NO

         4 PDB1C                         READ WRITE NO

## Check your tempfiles

SQL> select * from dba_temp_files;

FILE_NAME

——————————————————————————–

   FILE_ID TABLESPACE_NAME                     BYTES     BLOCKS STATUS

———- —————————— ———- ———- ——-

RELATIVE_FNO AUT   MAXBYTES  MAXBLOCKS INCREMENT_BY USER_BYTES USER_BLOCKS

———— — ———- ———- ———— ———- ———–

SHARED           INST_ID

————- ———-

+DATA/PDB1C/TEMPFILE/temp.263.1087120765

         1 TEMP                            290455552      35456 ONLINE

           1 YES 3.4360E+10    4194302           80  289406976       35328

SHARED

## If not in place,  on prim side you will  need to add a temp file to the temp tablespace  :

SQL> alter tablespace temp add tempfile ‘+DATA’ size 100M;

## Check

SQL> show con_name

CON_NAME

——————————

CDB$ROOT

## Change into your PDB environment

SQL> alter session set container = PDB1C;

### Check if all tablespaces are indeed encrypted.

SQL> select TABLESPACE_NAME , ENCRYPTED from dba_tablespaces;

TABLESPACE_NAME                ENC

—————————— —

SYSTEM                         YES

SYSAUX                         YES

UNDOTBS1                       YES

UNDO_2                         YES

USERS                          YES

TEMP                           YES

HUDDEL                         YES

7 rows selected.

When creating the pdb by hand , you will see that system , sysaux , undox are not encrypted , which will prevent you from moving beyond a  ‘restricted mode ‘ which shows when doing ‘show pdbs’ .

Next steps , when pdb  is not completely encrypted:

alter session set container = PDB1

select tablespace_name,encrypted from dba_tablespaces  order by 1 ;

## This might show something similar to below:

TABLESPACE_NAME                ENC

—————————— —

HUDDEL                         YES

SYSAUX                         NO

SYSTEM                         NO

TEMP                           NO

UNDOTBS1                       NO

UNDO_2                         YES

This will be an issue for cloning cause the clone will inherit this as well! So you should fix it.

ALTER TABLESPACE SYSTEM ENCRYPTION OFFLINE ENCRYPT;

ALTER TABLESPACE SYSAUX ENCRYPTION OFFLINE ENCRYPT;

ALTER TABLESPACE UNDOTBS1 ENCRYPTION OFFLINE ENCRYPT;

Note.  When testing this I was unable to make Temp encrypted as well.

Now let”s check again:

SQL> alter pluggable database PDB1 open instances = all;

SQL> select tablespace_name, encrypted from dba_tablespaces order by 1 ;

TABLESPACE_NAME                ENC

—————————— —

HUDDEL                         YES

SYSAUX                         YES

SYSTEM                         YES

TEMP                           NO

UNDOTBS1                       YES

UNDO_2                         YES

Note: After that first challenge (cloning a a pdb from a pdb  that was created by hand ) we had another issue that  sysaux tablespace was showing unencrypted blocks.

## so performed these steps :

Of course this could be fixed as well:

## make sure you are in your pdb.

SQL> show con_name

CON_NAME

——————————

PDB1C

## On the Primary  Side perform  a rekey of  the encryption of the sysaux tablespace:

SQL> ALTER TABLESPACE SYSAUX ENCRYPTION USING ‘AES128’ REKEY;

## Checking is believing:

SQL> select  tablespace_name,encrypted from  dba_tablespaces order by 1 ;

TABLESPACE_NAME                ENC

—————————— —

HUDDEL                         YES

SYSAUX                         YES

SYSTEM                         YES

TEMP                           NO

UNDOTBS1                       YES

UNDO_2                         YES

6 rows selected.

## Now lets check on SB Side a well:

SQL> show pdbs

    CON_ID CON_NAME                OPEN MODE  RESTRICTED

———- —————————— ———- ———-

   3 PDB1            READ ONLY  NO

   4 PDB1C           MOUNTED    NO

## Since we had the issue with encryption of Sysaux  PDB1C could not move beyond  mounted on sb side.

## Let’s give it an other try ( after fixing as described above).

SQL> alter pluggable database PDB1C open read only instances = all;

## Check from Root container that the SB side is happy now in the active Data Guard setup:

SQL> show pdbs

    CON_ID CON_NAME                OPEN MODE  RESTRICTED

———- —————————— ———- ———-

   3 PDB1            READ ONLY  NO

   4 PDB1C           READ ONLY  NO

As always seeing is believing. Always check scenarios  as the above in a Non Prod Environment first and test test test.

Till we meet again.

Mathijs.

Mission Critical system with Oracle Rac

Introduction.

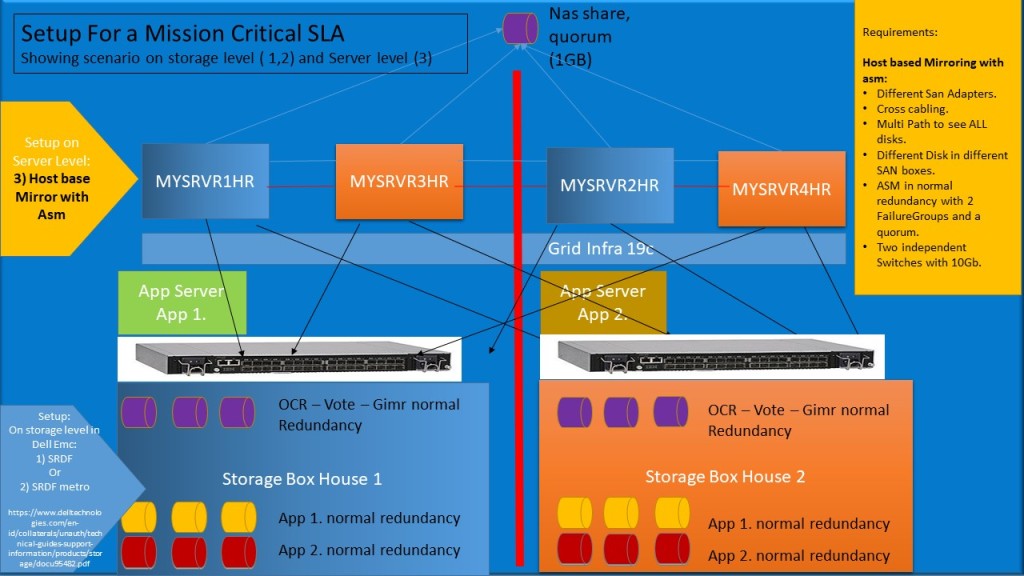
Brief discussion of a case study for mission critical (rac) system(s) in various buildings.

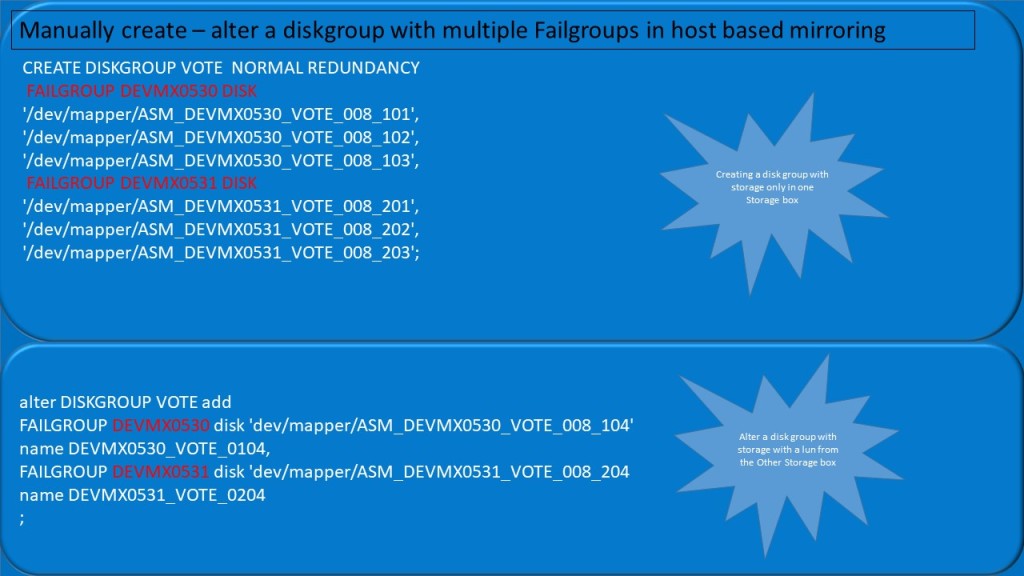
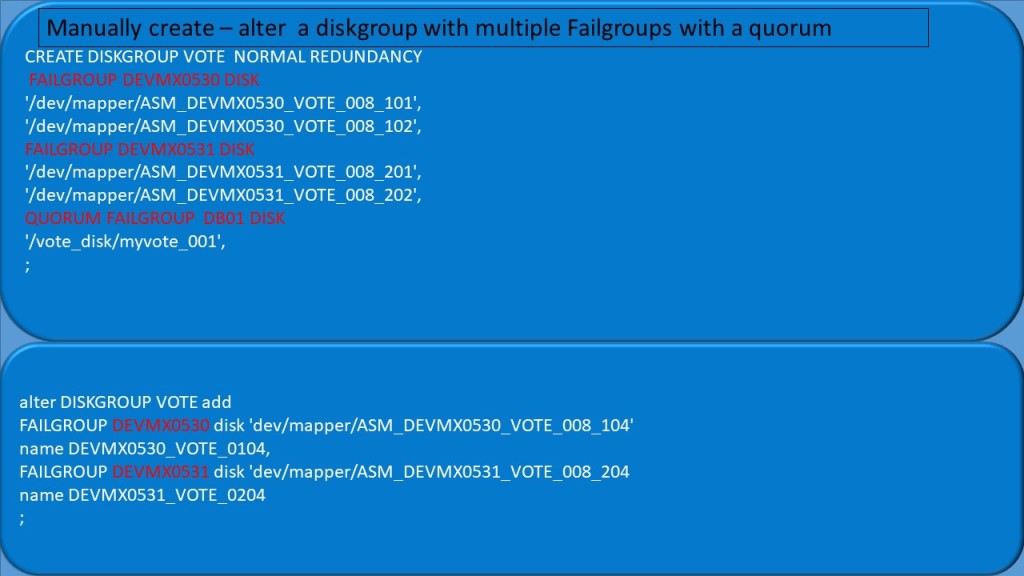
In this case study there are two storage boxes , each one on different location and referred to a mx0530 or mx0531. In assigning the luns in this concept a naming convention as below was thought of as an identifier for them.

If your really want to take it to the next level an additional lun is needed as a quorum disk:

Information used for this case study can be retrieved with a big thank you to Markus for sharing this on the web.:

As always enjoy,

Mathijs

Changing Hearbeat in Oracle Rac.

 
1As of 11.2 Grid Infrastructure, the private network configuration is not only stored in OCR but also in the gpnp profile.  If the private network is not available or its definition is incorrect, the CRSD process will not start and any subsequent changes to the OCR will be impossible. Therefore care needs to be taken when making modifications to the configuration of the private network. It is important to perform the changes in the correct order. Please also note that manual modification of gpnp profile is not supported.
Please take a backup of profile.xml on all cluster nodes before proceeding, as grid user:
cd $GRID_HOME/gpnp/<hostname>/profiles/peer/
cd /app/oracle/product/12.x.x/grid/gpnp/mysrvrahr/profiles/peer
cd /app/oracle/product/12.x.x/grid/gpnp/mysrvrbhr/profiles/peer
cp -p profile.xml profile.xml.bk
2Ensure Oracle Clusterware is running on ALL cluster nodes in the cluster and save current status of resource.
/app/oracle/product/12.x.x/grid/bin/crsctl check cluster -all
/app/oracle/product/12.x.x/grid/bin/crsctl status resource -t>/tmp/beforeNewIps.lst
3As grid user ( always curious who might that b, to me it was the Oracle user btw.):
Get the existing information.
Here you will see only One interconnect in place For example:
/app/oracle/product/12.x.x/grid/bin/oifcfg getif
bond1  172.18.112.208  global  cluster_interconnect
bond0  195.233.190.64  global  public
##
Check the interfaces / subnet address can be identified by command for eth specifically:
/app/oracle/product/12.x.x/grid/bin/oifcfg iflist|grep -i eth|sort
eth0  172.18.32.0
eth2  192.168.10.0
eth6  192.168.11.0
or check  interfaces / subnets in general on OS with oifcfg:
/app/oracle/product/12.x.x/grid/bin/oifcfg iflist|sort
4Add the new cluster_interconnect information:
/app/oracle/product/12.x.x/grid/bin/oifcfg setif -global eth2/192.168.10.0:cluster_interconnect,asm
/app/oracle/product/12.x.x/grid/bin/oifcfg setif -global eth6/192.168.11.0:cluster_interconnect,asm
5Verify the change:
/app/oracle/product/12.x.x/grid/bin/oifcfg getif

With this information checked and in place it is time for setting up new listeners for asm since the original ASM listener during the installation used eth0 and that eth0 will be dropped  – removed from cluster configuration in steps below:

Existing listener ASMNET1LSNR  will become new one ASMNET122LSNR.
srvctl add listener -asmlistener -l ASMNET1221LSNR -subnet 192.168.10.0 (as mentioned this is the eth2 interface that we are going to use).
srvctl add listener -asmlistener -l ASMNET1222LSNR -subnet 192.168.11.0 (as mentioned this is the eth6 interface that we are going to use).

As always seeing is believing : use 
crsctl status resource -t to see details.
Note: The new ASM listener is created as a resource and it is in a status offline offline on all nodes in the cluster at this point and time.

In the next step we will remove the old ASM listener, and use a -f option to prevent errors – messages with regard to dependencies.

srvctl update listener -listener ASMNET1LSNR_ASM -asm -remove -force
I have checked again with crsctl status resource -t to make sure the old resource is gone now.

Removing the old ASM listener
In the Mos note there is a little inconsistency because it claims  that as a next step the old ASM listener should be stopped.  I was able to grep for the listener ( ps -ef|grep -i inherit)  and i saw it on OS level on the machine(S). But I am not able to stop that listener  since the cluster resource is already gone and lsnrctl did not work. Solution: What I noticed that when I skipped this step and stopped and started the cluster which is mandatory in this scenario, the listener was gone on all nodes.
Should have given this command, but that is NOT working: lsnrctl stop ASMNET1LSNR_ASM
Check configuration before restarting GI:

First command: srvctl config listener -asmlistener Name: ASMNET122LSNR_ASM Type: ASM Listener Owner: oracle Subnet: 192.168.10.0 Home: <CRS home> End points: TCP:1527 Listener is enabled. Listener is individually enabled on nodes: Listener is individually disabled on nodes: Second Command: srvctl config asm ASM home: <CRS home> Password file: +VOTE/orapwASM Backup of Password file: ASM listener: LISTENER ASM instance count: ALL Cluster ASM listener: ASMNET122LSNR_ASM
6In GridInfrastructure: Shutdown Oracle Clusterware on all nodes and disable the Oracle Clusterware as root user ( in my example i was allowed to sudo ):
 sudo su – 
./app/oracle/product/12.x.x/grid/bin/crsctl stop crs
./app/oracle/product/12.x.x/grid/bin/crsctl disable crs
7Make the network configuration change at OS level as required, ensure the new interface is available on all nodes after the change. ( check to ping the interfaces on all nodes ).
for x in 10 11;do for xx in 75 76 77 78;do ping -c2 192.168.${x}.${xx}|egrep ‘icmp_seq|transmitted’;done;echo;done
for x in a b c d; do for xx in 1 2;do ping -c2 mysrvr${x}hr-hb$xx|egrep ‘icmp_seq|transmitted’;done;echo;done 
8Restart Oracle Clusterware on all nodes as root user:
sudo su – 
./app/oracle/product/12.x.x/grid/bin/crsctl start crs
9Check 
/app/oracle/product/12.x.x/grid/bin/crsctl check cluster -all
/app/oracle/product/12.x.x/grid/bin/crsctl status resource -t>/tmp/afterNewIps.lst
sdiff /tmp/afterNewIps.lst /tmp/beforeNewIps.lst
Enable Oracle Clusterware on all nodes as root user:
./app/oracle/product/12.x.x/grid/bin/crsctl enable crs
10Remove the old interface if required:
/app/oracle/product/12.x.x/grid/bin/oifcfg delif -global bond1/172.18.112.208:cluster_interconnect
11Verify the remove:
/app/oracle/product/12.x.x/grid/bin/oifcfg getif

Upgrading to 19C GI from 12.2

Required Software:

Needed software 
GI:  LINUX.X64_193000_grid_home.zip
RDBMS:  LINUX.X64_193000_db_home.zip
30899722 for April 2020p30899722_190000_Linux-x86-64.zip
Opatch:p6880880_200000_Linux-x86-64.zip
Autonomous Health Framework (AHF) – Including TFA and ORAchk/EXAChkAHF-LINUX_v20.1.3.zip

The current installation has to be checked with 2 tools: orachk and cluvfy. Both are included in the 19c software, but it is good practice to download the actual version from MOS (note 1268927.1).

Note: the AHF has 2 requirements: app 5 – 10 GB of storage AND the hierarchy of directory where you will install it needs to be owned by root in full. Recommended to create a FS in such way root:root  in /var/SP/ahf and perform install there.

oracle@mysrvr:/app/oracle/stage [MYDB]# ls -al *

-rw-r–r–.  1 oracle dba  165 Jun 24 11:30 status.file

Patch 28553832 was needed on mysrvr since it was not patched since 2018:

total 433452

drwxr-xr-x. 3 oracle dba      4096 Jun 24 11:59 .

drwxr-xr-x. 9 oracle dba      4096 Jun 24 11:58 ..

drwxr-x—. 4 oracle dba      4096 Dec 25  2018 28553832

-rw-r–r–. 1 oracle dba 443838687 Jun 24 11:59 p28553832_12201190115OCWJAN2019RU_Linux-x86-64.zip

Patch 30899722 for april 2020:

total 12

drwxr-xr-x. 3 oracle dba 4096 Jun 19 11:43 .

drwxr-xr-x. 9 oracle dba 4096 Jun 24 11:58 ..

drwxr-x—. 4 oracle dba 4096 Jun 24 11:00 Patch_30899722_GI_RELEASE_UPDATE_19.7.0.0.0__14_Apr_2020

Patch CVU only needed on new cluster:

total 286872

-rwxr-x—.  1 oracle dba 293648959 Jun 24 10:19 cvupack_Linux_x86_64.zip

To install GI:

total 2821488

drwxr-xr-x. 3 oracle dba       4096 Jun 24 10:20 .

drwxr-xr-x. 9 oracle dba       4096 Jun 24 11:58 ..

drwxr-xr-x. 2 oracle dba       4096 Jun 24 10:22 DELETEME

-rwxr-x—. 1 oracle dba 2889184573 Jun 19 11:38 LINUX.X64_193000_grid_home.zip

Latest versions of Opatch:

total 231280

drwxr-xr-x. 2 oracle dba      4096 Jun 24 10:54 .

drwxr-xr-x. 9 oracle dba      4096 Jun 24 11:58 ..

-rwxr-x—. 1 oracle dba 118408624 Jun 24 10:54 p6880880_200000_Linux-x86-64.zip

Database software RDBMS:

total 2988008

drwxr-xr-x. 2 oracle dba       4096 Jun 19 11:40 .

drwxr-xr-x. 9 oracle dba       4096 Jun 24 11:58 ..

-rwxr-x—. 1 oracle dba 3059705302 Jun 19 11:43 LINUX.X64_193000_db_home.zip

Latest TFA:

total 258556

drwxr-xr-x. 2 oracle dba      4096 Jun 19 14:30 .

drwxr-xr-x. 9 oracle dba      4096 Jun 24 11:58 ..

-rw-r–r–. 1 oracle dba 264751391 Jun 19 14:30 TFA-LINUX_v19.2.1.zip

Running preparations:

./cluvfy stage -pre crsinst -n <Nodes>  -verbose > /tmp/results_cluvfy_001.txt

This showed below types of errors, which due to fact this is an existing box with clusterware running was ok ( after checking proceeded with the installation):

Failures were encountered during execution of CVU verification request “stage -pre crsinst”.

Verifying Group Existence: asmadmin …FAILED

mysrvr: PRVG-10461 : Group “asmadmin” selected for privileges “OSASM” does

          not exist on node “mysrvr”.

Verifying Group Existence: asmdba …FAILED

mysrvr: PRVG-10461 : Group “asmdba” selected for privileges “OSDBA” does not

          exist on node “mysrvr”.

Verifying Group Membership: asmadmin …FAILED

mysrvr: PRVG-10460 : User “oracle” does not belong to group “asmadmin”

          selected for privileges “OSASM” on node “mysrvr”.

Verifying Group Membership: asmdba …FAILED

mysrvr: PRVG-10460 : User “oracle” does not belong to group “asmdba” selected

          for privileges “OSDBA” on node “mysrvr”.

Verifying Node Connectivity …WARNING

mysrvr: PRVG-11069 : IP address “169.254.0.2” of network interface “idrac” on

          the node “mysrvr” would conflict with HAIP usage.

Verifying Domain Sockets …FAILED

mysrvr: PRVG-11750 : File “/var/tmp/.oracle/ora_gipc_monitor_ag_mysrvr_”

          exists on node “mysrvr”.

mysrvr: PRVG-11750 : File “/var/tmp/.oracle/ora_gipc_css_ctrllcl_mysrvr_”

          exists on node “mysrvr”.

mysrvr: PRVG-11750 : File “/var/tmp/.oracle/ora_gipc_mysrvr_EVMD” exists on

          node “mysrvr”.

mysrvr: PRVG-11750 : File “/var/tmp/.oracle/ora_gipc_mysrvr_CSSD” exists on

          node “mysrvr”.

mysrvr: PRVG-11750 : File “/var/tmp/.oracle/ora_gipc_agent_ag_mysrvr_”

          exists on node “mysrvr”.

mysrvr: PRVG-11750 : File “/var/tmp/.oracle/ora_gipc_mysrvr_INIT” exists on

          node “mysrvr”.

Verifying ASM Filter Driver configuration …WARNING

mysrvr: PRVE-10237 : Existence of files

          “/lib/modules/3.10.0-693.el7.x86_64/extra/oracle/oracleafd.ko,/lib/mod

          ules/3.10.0-862.9.1.el7.x86_64/weak-updates/oracle/oracleafd.ko,/opt/o

          racle/extapi/64/asm/orcl/1/libafd12.so” is not expected on node

          “mysrvr” before Clusterware installation or upgrade.

mysrvr: PRVE-10239 : ASM Filter Driver “oracleafd” is not expected to be

          loaded on node “mysrvr” before Clusterware installation or upgrade.

Grid Infrastructure installation:

Before really starting the Gui follow these steps:

– GRID_HOME:

mkdir -p /app/grid/product/19c/grid

cd /app/grid/product/19c/grid

ls -la

If not empty:

rm -rf *

rm -rf .patch_storage

## Unzip the file in /app/grid/product/19c/grid

unzip /app/oracle/stage/GI/LINUX.X64_193000_grid_home.zip

Opatch version.

For the installation get yourself the latest version of opatch from Metalink and add it to stage directory.

cd /app/grid/product/19c/grid

mkdir OPatch_old_20200513

cp -pir OPatch/* OPatch_old_20200513/

unzip /app/oracle/stage/Opstch/p6880880_200000_Linux-x86-64.zip

-> respond with “A”

Below will patch the GI software with April 2020 And will start the Gui after.

cd /app/grid/product/19c/grid/

unset ORACLE_HOME

unset ORACLE_BASE

export ORACLE_BASE=/app/oracle

./gridSetup.sh -applyPSU /app/oracle/stage/30899722/Patch_30899722_GI_RELEASE_UPDATE_19.7.0.0.0__14_Apr_2020/30899722

##After patching, the Installer started which requested me to stop the databases that were using the current ASM.

##Stopping the instances that are all using the same Oracle home:

srvctl stop home -o /app/oracle/product/12201/db -s /app/oracle/stage/status.file -n $(uname -n) -stopoption immediate

## after that I restarted:

/app/grid/product/19c/grid/gridSetup.sh &

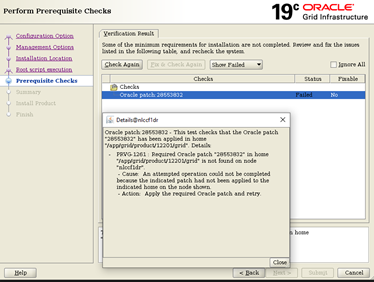
In the next screens, select next till the pre-requisite Checks are running. There I ended up with this:

This message made it all to clear to me that Patching was needed.  After completing that I should do a retry.

Patch 28553832  :

Oracle Clusterware 12C Release 2 (12.2.0.1.0OCWJAN2019RU)

Patch for Bug# 28553832 for Linux-x86-64 platform

This patch is RAC Rolling Installable.

Released: 25 December , 2018

6 Bugs Fixed by This Patch

This patch includes the following bug fixes:

13852018 DB12; NEED TEST PATCH FOR DB12 FROM SE FOR EVERY CANDIDATE DB LABEL

The log of current session can be found at:

  /app/oracle/crsdata/mysrvr/crsconfig/roothas_2020-06-24_01-03-35PM.log

2020/06/24 13:03:36 CLSRSC-595: Executing upgrade step 1 of 12: ‘UpgPrechecks’.

2020/06/24 13:03:39 CLSRSC-595: Executing upgrade step 2 of 12: ‘GetOldConfig’.

2020/06/24 13:03:41 CLSRSC-595: Executing upgrade step 3 of 12: ‘GenSiteGUIDs’.

2020/06/24 13:03:41 CLSRSC-595: Executing upgrade step 4 of 12: ‘SetupOSD’.

2020/06/24 13:03:41 CLSRSC-595: Executing upgrade step 5 of 12: ‘PreUpgrade’.

ASM has been upgraded and started successfully.

2020/06/24 13:04:38 CLSRSC-595: Executing upgrade step 6 of 12: ‘UpgradeAFD’.

2020/06/24 13:06:43 CLSRSC-595: Executing upgrade step 7 of 12: ‘UpgradeOLR’.

clscfg: EXISTING configuration version 0 detected.

Creating OCR keys for user ‘oracle’, privgrp ‘dba’..

Operation successful.

2020/06/24 13:06:47 CLSRSC-595: Executing upgrade step 8 of 12: ‘UpgradeOCR’.

LOCAL ONLY MODE

Successfully accumulated necessary OCR keys.

Creating OCR keys for user ‘root’, privgrp ‘root’..

Operation successful.

CRS-4664: Node mysrvr successfully pinned.

2020/06/24 13:06:50 CLSRSC-595: Executing upgrade step 9 of 12: ‘CreateOHASD’.

2020/06/24 13:06:51 CLSRSC-595: Executing upgrade step 10 of 12: ‘ConfigOHASD’.

2020/06/24 13:06:51 CLSRSC-329: Replacing Clusterware entries in file ‘oracle-ohasd.service’

2020/06/24 13:07:34 CLSRSC-595: Executing upgrade step 11 of 12: ‘UpgradeSIHA’.

mysrvr     2020/06/24 13:08:33     /app/oracle/crsdata/mysrvr/olr/backup_20200624_130833.olr     3633918477

mysrvr     2018/11/05 21:55:51     /app/grid/product/12201/grid/cdata/mysrvr/backup_20181105_215551.olr     2960767134

2020/06/24 13:08:34 CLSRSC-595: Executing upgrade step 12 of 12: ‘InstallACFS’.

2020/06/24 13:10:03 CLSRSC-327: Successfully configured Oracle Restart for a standalone server

## Clicked ok

Photo by Pixabay on Pexels.com

srvctl start home -o /app/oracle/product/12201/db -s /app/oracle/stage/status.file

Checks:

oracle@mysrvr:/opt/oracle/diag/asm/+asm/+ASM/trace [+ASM]#  crsctl query has releaseversion

Oracle High Availability Services release version on the local node is [19.0.0.0.0]

oracle@mysrvr:/opt/oracle/diag/asm/+asm/+ASM/trace [+ASM]# crsctl query has releasepatch

Oracle Clusterware release patch level is [3633918477] and the complete list of patches [30869156 30869304 30894985 30898856 ] have been applied on the local node. The release patch string is [19.7.0.0.0].

oracle@mysrvr:/opt/oracle/diag/asm/+asm/+ASM/trace [+ASM]#  crsctl query has softwarepatch

Oracle Clusterware patch level on node mysrvr is [3633918477].

Make an Oracle export to asm diskgroup

Introduction

Good day to you all , quick blog on how to make an export in Oracle with datapump to an ASM diskgroup. Background of such an action could be a scenario that your database server does not provide “normal filesystem”.

  • In an Asm Diskgroup:
    I have created ( with asmcmd +DATA02/MYDEV/DPDUMP)
  • In the Oracle database:
    create or replace directory ASM_DUMP as ‘+DATA02/MYDEV/DPDUMP’;
    grant read,write on directory asm_dump to system;
  • On Linux create this subdirectory, (note it is mandatory to be able to write during the expdp to a NON asm Filesystem):
    /opt/oracle/TOSCAOSV1/admin/restore/DPLOG.
  • In the Oracle database create a directory which will hold the logfile of the expdp:
    create or replace directory ASMDP_LOGDIR as ‘/opt/oracle/MYDB1/admin/restore/DPLOG’;
    grant read,write on directory ASMDP_LOGDIR to system;
  • Seeing is believing so lets check:
    Set lines 2000
    select * from dba_directories;

DSYS ASM_DUMP
+DATA02/TOSCAOSV/DPDUMP

SYS ASMDP_LOGDIR
/opt/oracle/TOSCAOSV2/admin/restore/DPLOG

  1. Create a Parfile for the expdp
    PARALLEL=1
    userid=system
    directory=ASM_DUMP
    logfile=ASMDP_LOGDIR:myMyDevDp.log
    DUMPFILE=myMyDev_%U.dmp
    FILESIZE=4G
    COMPRESSION=ALL
    JOB_NAME=backup_MyDev_schemas
    SCHEMAS=TOSCAADMIN

oracle@mysrvr1:/opt/oracle/MYDB1/admin/DP [MYDB1]# ls -ltr
total 4
-rw-r–r–. 1 oracle dba 189 Jun 15 13:02 expdp.par

  1. Run the datapump: expdp parfile=/opt/oracle/MYDB1/admin/DP/expdp.par

Goldengate when TDE in your database is used.

Introduction

It might sound like a movie trilogy to touch similar topic for the 3rd time, and frankly in my last two topics touched ground on these topics:

Well today the third article has to rise. Simply because there is always an interesting interactions requiring a follow up between Admins and teams using a solution. In such galaxy far far away the question would rise:what will happen if you armor your tablespaces with TDE and then you decide to use Goldengate when classic capture is being used as tool to extract data from that environment. (spoiler alert Goldengate (GG) will break).

On the various capture models in Goldengate check this url:

https://docs.oracle.com/goldengate/1212/gg-winux/GIORA/process_mode.htm#GIORA209

For this blog really all credits needs to be given to a brother in arms, a close friend and a most seasoned dba (Mr. Roel Hendriks) who I had the honor to work with during Project(s). He did the research implemented this solotion first. Since then I was able to implement it on various platforms. For saga completion it is now my goal to complete the trilogy with this blog.

Additional required steps with TDE And GG in place

  • Create package dbms_internal_clkm on database by running @?/rdbms/admin/prvtclkm.plb.
  • Grant this package to database account which extract data from the database: “grant execute on dbms_internal_clkm to ggapp;”. This package enables database accounts to extract data via GoldenGate in a encrypted database.
  • Find out the location of your wallet location via the view v$encryption_wallet or the sqlnet.ora file.

This will show something like :

oracle@mysrvr:/app/oracle/admin/WALLET/MYDB1 [MYDB1]# ls -lisa

total 48

74  4 drwxr-xr-x. 2 oracle dba 4096 Sep 13 06:37 .

 2  4 drwxrwxr-x. 5 oracle dba 4096 Sep 13 08:52 ..

82 12 -rw——-. 1 oracle dba 5304 Sep 13 06:37 cwallet.sso

78  4 -rw——-. 1 oracle dba 2555 Sep 13 05:55 ewallet_2019091303553484.p12

80  4 -rw——-. 1 oracle dba 3803 Sep 13 05:57 ewallet_2019091303572233.p12

81  8 -rw——-. 1 oracle dba 5067 Sep 13 06:01 ewallet_2019091304014993.p12

77 12 -rw——-. 1 oracle dba 5259 Sep 13 06:01 ewallet.p12

  • Execute at wallet location (you have to supply the wallet password) :

(means in this case in:  /app/oracle/admin/WALLET/ MYDB1)

mkstore -wrl ./ -createEntry ORACLE.SECURITY.CL.ENCRYPTION.ORACLEGG

Oracle Secret Store Tool : Version 12.2.0.1.0

Copyright (c) 2004, 2016, Oracle and/or its affiliates. All rights reserved.

 ## you have to enter a password ( twice):

— supplied password: hugo ( this password will be needed in GGSCI)

Enter your secret/Password:

Re-enter your secret/Password: 

Enter wallet password:

  • Verify the result:

mkstore -wrl . -list

Oracle Secret Store Tool : Version 12.2.0.1.0

Copyright (c) 2004, 2016, Oracle and/or its affiliates. All rights reserved.

  • Enter wallet password:

## when wallet password is given you will see similar to below:

Oracle Secret Store entries:

ORACLE.SECURITY.CL.ENCRYPTION.ORACLEGG

ORACLE.SECURITY.DB.ENCRYPTION.Ae/sVNN8L0+iv/uBOenqJsQZZZZZZZZZZZZZZZZZZZZZZZZZZZZZZZZZZ

ORACLE.SECURITY.DB.ENCRYPTION.AUAh7+KLWk+6v92xdM/qIxcZZZZZZZZZZZZZZZZZZZZZZZZZZZZZZZZZZ

ORACLE.SECURITY.DB.ENCRYPTION.MASTERKEY

ORACLE.SECURITY.ID.ENCRYPTION.

ORACLE.SECURITY.KB.ENCRYPTION.

ORACLE.SECURITY.KM.ENCRYPTION.Ae/sVNN8L0+iv/uBOenqJsQZZZZZZZZZZZZZZZZZZZZZZZZZZZZZZZZZZ

ORACLE.SECURITY.KM.ENCRYPTION.AUAh7+KLWk+6v92xdM/qIxcZZZZZZZZZZZZZZZZZZZZZZZZZZZZZZZZZZ

##

  • On os you will now see similar to this:

oracle@mysrvr:/app/oracle/admin/WALLET/MYDB1 [MYDB1]# ls -lisa

total 48

74  4 drwxr-xr-x. 2 oracle dba 4096 Sep 19 11:16 .

 2  4 drwxrwxr-x. 5 oracle dba 4096 Sep 13 08:52 ..

82 12 -rw——-. 1 oracle dba 5453 Sep 19 11:17 cwallet.sso

83  0 -rw——-. 1 oracle dba    0 Sep 19 11:16 cwallet.sso.lck

78  4 -rw——-. 1 oracle dba 2555 Sep 13 05:55 ewallet_2019091303553484.p12

80  4 -rw——-. 1 oracle dba 3803 Sep 13 05:57 ewallet_2019091303572233.p12

81  8 -rw——-. 1 oracle dba 5067 Sep 13 06:01 ewallet_2019091304014993.p12

77 12 -rw——-. 1 oracle dba 5408 Sep 19 11:17 ewallet.p12

79  0 -rw——-. 1 oracle dba    0 Sep 19 11:16 ewallet.p12.lck

  • Switch logfile.
  • Stop / start the database.
  • Be aware:

  The “wallet_type” in the v$encryption_wallet be ‘unknown’  because of using mkstore utility. This is expected behavior: https://docs.oracle.com/database/121/REFRN/GUID-054B6FBC-4263-4A91-AEBD-D6FB50C22107.htm#REFRN30488
7.168 V$ENCRYPTION_WALLET

  • SQL> select * from v$encryption_wallet;
  • WRL_TYPE
  • ——————–
  • WRL_PARAMETER
  • ——————————————————————————–
  • STATUS                         WALLET_TYPE          WALLET_OR FULLY_BAC
  • —————————— ——————– ——— ———
  •     CON_ID
  • ———-
  • FILE
  • /app/oracle/admin/WALLET/MYDB1/
  • OPEN                           UNKNOWN              SINGLE    NO
  •          0

Goldengate part, when TDE is involved

  1. Run GGSCI.
  2. Issue the ENCRYPT PASSWORD command to encrypt the shared secret so that it is obfuscated within the Extract parameter file. This is a security requirement.
  3. ENCRYPT PASSWORD hugo {AES128 | AES192 | AES256} ENCRYPTKEY keyname

Where:

  • hugo is the clear-text shared secret. This value is case-sensitive.
  • {AES128 | AES192 | AES256} specifies Advanced Encryption Standard (AES) encryption. Specify one of the values, which represents the desired key length.
  • keyname is the logical name of the encryption key in the ENCKEYS lookup file. Oracle GoldenGate uses this key to look up the actual key in the ENCKEYS file. To create a key and ENCKEYS file, see Administering Oracle GoldenGate for Windows and UNIX.

Example:

ENCRYPT PASSWORD hugo AES256 ENCRYPTKEY mykey1

  • In the Extract parameter file, use the DBOPTIONS parameter with the DECRYPTPASSWORD option. As input, supply the encrypted shared secret and the decryption key.

DBOPTIONS DECRYPTPASSWORD hugo {AES128 | AES192 | AES256} ENCRYPTKEY keyname

In our case the DBOPTIONS was:

DBOPTIONS DECRYPTPASSWORD “AADAAAAAAAAAAAMANAREQEREYDJFOBYALGZHQCLGUCCHQGBDZZZZZZZZZZZZZZZZZZZZZZZZZZZZZZZZZZAAA

Happy reading,

Mathijs

TDE SETUP in a rac environment:

Summary:

This document will share the steps to implement TDE (transparent Database encryption) in the database in a Cluster.  Required Steps that are needed to implement it:

  • have the requirement to have an ACFS file system in place with proper setup there (see below).
  • Have the requirement to have an adapted sqlnet.ora in a centralized location.

Details:

  1. Setup will require preparations. In our case, the first database was MYDB. Steps below will be identical for each database in scope. (Of course you need to change the database name according to the database in your scope).

Mysrv[3-4]dr is holding the MYDB database.

  • Create a Diskgroup in normal Redundancy and call it TDE_KEYS.
  • Prepare the acfs created mountpoint by creating a TDE_VOL.
  • Mount the TDE_VOL as /app/oracle/admin/WALLET
  • On the acfs mount (/app/oracle/admin/WALLET
  • cd /app/oracle/admin/WALLET

mkdir MYDB,

ln -sf MYDB MYDB <1,2>

This acfs filesystem is shared between the clusternode.

With the mkdir you wil create an entry for  the database you are about to encrypt , with the 2 links you will point both instances to the database directory , to keep all in a central place.

  • Make sure you have a centralized Sqlnet.ora and adapt this one. As you can see the ORACLE_SID ( the instance name offers a flexible input in this way):

ENCRYPTION_WALLET_LOCATION =

  (SOURCE =(METHOD = FILE)(METHOD_DATA =

    (DIRECTORY = /app/oracle/admin/WALLET/$ORACLE_SID/ )

                          )

  )

  • In the database first check:

SQL> select * from v$encryption_wallet;

WRL_TYPE

——————–

WRL_PARAMETER

——————————————————————————–

STATUS                                       WALLET_TYPE               WALLET_OR FULLY_BAC

—————————— ——————– ——— ———

    CON_ID

———-

FILE

/app/oracle/admin/WALLET/MYDB1/

NOT_AVAILABLE                                    UNKNOWN                    SINGLE    UNDEFINED

                 0

  • With the below command you will create the keystore  and you will give the keystore a password.

SQL> administer key management create keystore ‘/app/oracle/admin/WALLET/MYDB/’ identified by “mypwd19!”;

## Once that command is given Sqlplus  will report:

keystore altered.

## TIP Be sure the correct sqlnet is read (links?)

  • run below command to open your keystore:

SQL> administer key management set keystore open identified by “mypwd19!”;

## this will report in sqlplus:

keystore altered.

  1. Now is a good time to Check the status of your wallet:

SQL> select * from v$encryption_wallet;

WRL_TYPE

——————–

WRL_PARAMETER

——————————————————————————–

STATUS                                       WALLET_TYPE               WALLET_OR FULLY_BAC

—————————— ——————– ——— ———

    CON_ID

———-

FILE

/app/oracle/admin/WALLET/MYDB1/

OPEN_NO_MASTER_KEY                    PASSWORD                    SINGLE    UNDEFINED

                 0

  1.  Check  your encryption keys.

SQL> select key_id,activation_time from v$encryption_keys;

## sql will 1st time report:

no rows selected

## On Os you should already see the wallet similar to below:

SQL> host

oracle@Mysrv3dr:/app/oracle/admin/WALLET/MYDB []# ls -lisa

77 4 -rw——-. 1 oracle dba 2555 Sep 13 05:51 ewallet.p12

  1. In Sqlplus  now it is time to create the key:

SQL> administer key management create key identified by “mypwd19!” with backup;

  1. When you check your encryption keys again now:

SQL> select key_id,activation_time from v$encryption_keys;

KEY_ID

——————————————————————————

ACTIVATION_TIME

—————————————————————————

NcC1701D+mbkK+6v92xdM/qIxcXXXXXXXXXXXXXXXXXXXXXXXXXXXXXXXXXXXXXXX

  1. In sqlplus give below command:

SQL> administer key management use key ‘ NcC1701D+mbkK+6v92xdM/qIxcXXXXXXXXXXXXXXXXXXXXXXXXXXXXXXXXXXXXXXX

‘ identified by “mypwd19!” with backup;

## sqlplus will report:

keystore altered.

  1. Check again your encryption keys again to get something similar to below:

SQL> select key_id,activation_time from v$encryption_keys;

## now you will see an activation_time Too:

KEY_ID

——————————————————————————

ACTIVATION_TIME

—————————————————————————

NcC1701D+mbkK+6v92xdM/qIxcXXXXXXXXXXXXXXXXXXXXXXXXXXXXXXXXXXXXXXX

13-SEP-19 06.01.49.995963 AM +02:00

  1. As a test create a small  tablspace:

SQL> create tablespace ENC datafile ‘+MYDB_DATA’ size 10M encryption using ‘AES256’ default storage(encrypt);

## Check this with:

select tablespace_name,encrypted from dba_tablespaces order by 1;

## Sqlplus should report something like this:

SQL> select tablespace_name,encrypted from dba_tablespaces order by 1;

TABLESPACE_NAME                ENC

—————————— —

ENC                            YES

Now you are all set to create all required application tablespaces with these extra parameters  encryption using ‘AES256’ default storage(encrypt).

Automatically open the wallet

Note:   Basically a wallet needs to be open before you can access the database. This however can and should be altered: When opening your database this should automatically open the wallet:

  1. In sqlplus check:

SQL> select * from v$encryption_wallet;

WRL_TYPE

——————–

WRL_PARAMETER

——————————————————————————–

STATUS                                       WALLET_TYPE               WALLET_OR FULLY_BAC

—————————— ——————– ——— ———

    CON_ID

———-

FILE

/app/oracle/admin/WALLET/MYDB1/

OPEN                                           PASSWORD                    SINGLE    NO

                 0

  • Give  this command:

SQL> administer key management create auto_login keystore from keystore ‘/app/oracle/admin/WALLET/MYDB/’ identified by “mypwd19!”;

## sqlplus will report:

keystore altered.

## On OS you will see :

oracle@Mysrv3dr:/app/oracle/admin/WALLET/MYDB [MYDB1]# ls -lisa

total 48

74  4 drwxr-xr-x. 2 oracle dba 4096 Sep 13 06:37 .

 2  4 drwxrwxr-x. 5 oracle dba 4096 Sep 13 05:44 ..

82 12 -rw——-. 1 oracle dba 5304 Sep 13 06:37 cwallet.sso

78  4 -rw——-. 1 oracle dba 2555 Sep 13 05:55 ewallet_2019091303553484.p12

80  4 -rw——-. 1 oracle dba 3803 Sep 13 05:57 ewallet_2019091303572233.p12

81  8 -rw——-. 1 oracle dba 5067 Sep 13 06:01 ewallet_2019091304014993.p12

77 12 -rw——-. 1 oracle dba 5259 Sep 13 06:01 ewallet.p12

  • And in Sqlplus  too you  will see  a change.

SQL> SELECT * FROM v$encryption_wallet;

WRL_TYPE

——————–

WRL_PARAMETER

——————————————————————————–

STATUS                                       WALLET_TYPE               WALLET_OR FULLY_BAC

—————————— ——————– ——— ———

    CON_ID

———-

FILE

/app/oracle/admin/WALLET/MYDB1/

OPEN                                           AUTOLOGIN                  SINGLE    NO

                 0

Appendix 1 Create an acfs file system:

Idea was to setup acfs via asmca. This however did not work in first implementation due to error because ora.proxy_advm is offline on some nodes.

It should be:

crsctl stat res ora.proxy_advm -t

——————————————————————————–

Name           Target  State        Server                   State details      

——————————————————————————–

Local Resources

——————————————————————————–

ora.proxy_advm

               ONLINE  ONLINE       Mysrv3dr                 STABLE

               ONLINE  ONLINE       Mysrv4dr                 STABLE

If the status is offline check if the acfsmodule are loaded: lsmod | grep acfs

oracleacfs           4840664  2

oracleoks             663240  2 oracleacfs,oracleadvm

if they are not loaded on the local node: log in as root and perform

$GRID_HOME/bin/csrctl stop crs

$GRID_HOME/bin/acfstool install

$GRID_HOME/bin/crsctl start crs

Modules should be loaded now. Volume can be created in asmca (high protection, TDE_VOL1, 1GB)

The volume will show up under /dev/asm (/dev/asm/tde_vol1-301 in this case).

Mkdir  -p /app/oracle/admin/wallet

Cd /app/oracle

Chown –R oracle:dba admin

/sbin/mkfs -t acfs /dev/asm/tde_vol1-302

Register in clusterware:

/sbin/acfsutil registry -a /dev/asm/tde_vol1-302 /app/oracle/admin/WALLET

When wallet is not open in TDE Environment (ORA-28365)

Introduction

For one of the new environments i have setup TDE ( transparent Database Encryption) aiming at encryption on the tablespaces level for a Rac database. As part of the preparations i have created a Diskgroup in ASM with normal redundancy and i have created an ACFS filesystem on top of that which will hold the TDE – Keys.

After restarting the instances ( tailing the alert log of both is an old hab it ). This is what i noticed:

In node of instance 2  I saw in alert that:

2019-09-13T09:36:34.512565+02:00

Errors in file /app/oracle/diag/diag/rdbms/MYDBU10a/MYDBU10A2/trace/MYDBU10A2_j001_354937.trc:

ORA-12012: error on auto execute of job 4

ORA-28365: wallet is not open

ORA-06512: at “SYS.ADMIN_AUDIT”, line 102

## On os level in the mount of the Acfs filesystem ( /app/oracle/admin/WALLET ) I Saw this :

total 84

 2  4 drwxrwxr-x. 5 oracle dba   4096 Sep 13 07:58 .

15  4 drwxr-xr-x. 8 oracle dba   4096 Sep 13 05:42 ..

44  4 -rw-r–r–. 1 oracle dba    100 Sep 13 07:58 afiedt.buf

21 64 drwx——. 2 root   root 65536 Sep 13 05:42 lost+found

 ?  ? d?????????? ? ?      ?        ?            ? MYDBU10A

##Followed below steps :

## as root

mysrvr4dr:root:/root $ /sbin/acfsutil registry

Mount Object:

  Device: /dev/asm/MYDBU10avol-125

  Mount Point: /app/oracle/admin/MYDBU10A

  Disk Group: ACFS

  Volume: MYDBU10AVOL

  Options: none

  Nodes: all

  Accelerator Volumes:

Mount Object:

  Device: /dev/asm/netcfg_vol-125

  Mount Point: /app/oracle/admin/NETCFG/12.2.0.1/db/network/admin

  Disk Group: ACFS

  Volume: NETCFG_VOL

  Options: norootsuid

  Nodes: all

  Accelerator Volumes:

Mount Object:

  Device: /dev/asm/tde_vol-125

  Mount Point: /app/oracle/admin/WALLET

  Disk Group: ACFS

  Volume: TDE_VOL

  Options: none

  Nodes: all

  Accelerator Volumes:

## as root :

mysrvr4dr:root:/root $ umount /app/oracle/admin/WALLET

umount: /app/oracle/admin/WALLET: target is busy.

        (In some cases useful info about processes that use

         the device is found by lsof(8) or fuser(1))

umount.acfs: CLSU-00100: operating system function: OfsWaitProc failed with error data: 32

umount.acfs: CLSU-00101: operating system error message: Broken pipe

umount.acfs: CLSU-00103: error location: OWPR_1

umount.acfs: ACFS-04151: unmount of mount point /app/oracle/admin/WALLET failed

## who is out there :

mysrvr4dr:root:/root $ lsof /app/oracle/admin/WALLET

COMMAND    PID   USER   FD   TYPE    DEVICE SIZE/OFF NODE NAME

ksh      82160 oracle  cwd    DIR 252,64003     4096   74 /app/oracle/admin/WALLET/MYDBU10A (deleted)

ksh      82160 oracle   10r   DIR 252,64003     4096   74 /app/oracle/admin/WALLET/MYDBU10A (deleted)

ksh     240476 oracle  cwd    DIR 252,64003     4096    2 /app/oracle/admin/WALLET

ksh     240476 oracle   11r   DIR 252,64003     4096    2 /app/oracle/admin/WALLET

## kill them all

mysrvr4dr:root:/root $ kill -9 240476

mysrvr4dr:root:/root $ lsof /app/oracle/admin/WALLET

COMMAND   PID   USER   FD   TYPE    DEVICE SIZE/OFF NODE NAME

ksh     82160 oracle  cwd    DIR 252,64003     4096   74 /app/oracle/admin/WALLET/MYDBU10A (deleted)

ksh     82160 oracle   10r   DIR 252,64003     4096   74 /app/oracle/admin/WALLET/MYDBU10A (deleted)

mysrvr4dr:root:/root $ kill -9 82160

mysrvr4dr:root:/root $ lsof /app/oracle/admin/WALLET

## still root then do this:

mysrvr4dr:root:/root $ umount /app/oracle/admin/WALLET

# ah but a mount does not work since acfs mounts are not part of fstab.

mysrvr4dr:root:/root $ mount /app/oracle/admin/WALLET

mount: can’t find /app/oracle/admin/WALLET in /etc/fstab

mysrvr4dr:root:/root $ exit

logout

## as oracle

srvctl start filesystem -device /dev/asm/tde_vol-125 -node mysrvr4dr

oracle@mysrvr4dr:/home/oracle []# cd /app/oracle/admin

oracle@mysrvr4dr:/app/oracle/admin []# ls -lisa

total 32

    15 4 drwxr-xr-x.  8 oracle dba 4096 Sep 13 05:42 .

     2 4 drwxr-xr-x. 15 oracle dba 4096 Sep 12 11:36 ..

786508 4 drwxr-xr-x.  3 oracle dba 4096 Sep  9 09:25 +APX

    16 4 drwxr-xr-x.  3 oracle dba 4096 Sep  3 11:37 +ASM

     2 4 drwxrwxr-x. 19 oracle dba 4096 Sep 13 08:15 MYDBU10A

    21 0 lrwxrwxrwx.  1 oracle dba    8 Sep 12 09:43 MYDBU10A1 -> MYDBU10A

    20 0 lrwxrwxrwx.  1 oracle dba    8 Sep 12 09:43 MYDBU10A2 -> MYDBU10A

393302 4 drwx——.  4 oracle dba 4096 Sep  3 15:47 _mgmtdb

917505 4 drwxrwxr-x.  3 oracle dba 4096 Sep 13 05:21 NETCFG

     2 4 drwxrwxr-x.  5 oracle dba 4096 Sep 13 08:52 WALLET

Works again . all is well when it ends well .

Missing or Corrupted Spfile in ASM instance in Rac

Introduction:

Old saying is , always expect the unexpected, well  this time this was another proof of that. During patching of an 8 node cluster on the first node we came across 2 issues , both requiring a work around. Issue one was  that after applying January 2019 Cluster did not start. This workaround is not part of this note btw. The second issue was that once we had the first Workaround in place the asm instance on the first node would not start. This note is explaining the steps followed to create a new spfile for the ASM instance(s) in a rac cluster.

General information:

This was the scenario where we found ourselves in: Patching in a rolling way had started on the  first node with January 2019 on 12.2 Oracle (GI and RDBMS) the first node was patched but crs would not start ( and hmm never liked opatchauto a lot 2 b honest). Together with Oracle support a work around was provided  but after that the ASM instance still would not start. During compare of environments it showed one very significant  memory setting on this cluster. Maybe this would have been MEMORY_*  and we are using hugepages on that cluster)  that prevented asm from starting once the patching  on the first node completed .

As a work around we created a pfile and once the cluster on node one was up we started the asm instance with the  pfile ( which was altered by me).

However we could no longer update the spfile for the other asm instances since oracle told us that in a rolling upgrade mode  you cannot make changes to the spfile . That meant that on all 8 Nodes we performed the patching , and once crs was up we had to start the asm with a copy of the init.ora  we used on 1st node too. In our case 8 nodes with a local copy of the init.ora which did not make us happy at all. That however brought us to below scenario where you need to bring  the asm back to using an spfile .

Important note: Since oracle 11.2  the GPNP profile is the key for such change !!!!

From old days , came up with below scenario to create a pfile,  alter that file to meet your needs and bring that as a spfile for the asm instance :

Scenario

  • Could be used with a missing spfile  – or  corrupted .
  • With an existing spfile with wrong settings , but where  you cannot alter since you started  patching already ( spfile updates are prohibited in rolling upgrade scenario ) ,  so maybe best practice is to analyse spfile before.
  • Important message: Scenario  has the requirement that the FULL cluster stack is down and you will work with ONE node only!!

#### With spget you can check current location of spfile  in asmcmd.

ASMCMD [+] > spget

+VOTE/mysrvr18cl/ASMPARAMETERFILE/registry.253.978015605

#### created and altered the pfile on the first node. ( and copied it to all other nodes during the workaround).

oracle@mysrvr1dr:/app/grid/product/12201/grid/dbs []# cd /app/oracle/admin/+ASM1/pfile

oracle@mysrvr1dr:/app/oracle/admin/+ASM1/pfile []# ls -ltr

total 4

-rw-r–r–. 1 oracle dba 2433 Feb  8 09:23 initASM.ora

##### starting  cluster  1st attempt (recalled that the cluster needed 2 b in some part of restricted mode for that, so all of cluster was stopped , then below command was issued). But Oracle showed mercy , telling to use the correct syntax:

mysrvr1dr:root:/app/grid/product/12201/grid/bin $ ./crsctl start crs restrict

Parse error:

  ‘restrict’ is an invalid argument

Usage:

  crsctl start crs [-excl [-nocrs | -cssonly]] | [-wait | -waithas | -nowait] | [-noautostart]

     Start OHAS on this server

where

     -excl        Start Oracle Clusterware in exclusive mode

     -nocrs       Start Oracle Clusterware in exclusive mode without starting CRS

     -nowait      Do not wait for OHAS to start

     -wait        Wait until startup is complete and display all progress and status messages

     -waithas     Wait until startup is complete and display OHASD progress and status messages

     -cssonly     Start only CSS

     -noautostart Start only OHAS

## Then started cluster in exclusive mode ,  that failed too  btw since it tried to start the asm instance, which was still holding the original spfile with the incorrect information.

mysrvr1dr:root:/app/grid/product/12201/grid/bin $ ./crsctl start crs  -excl

  • CRS-2672: Attempting to start ‘ora.cssdmonitor’ on ‘mysrvr1dr’
  • CRS-2676: Start of ‘ora.cssdmonitor’ on ‘mysrvr1dr’ succeeded
  • CRS-2672: Attempting to start ‘ora.cssd’ on ‘mysrvr1dr’
  • CRS-2672: Attempting to start ‘ora.diskmon’ on ‘mysrvr1dr’
  • CRS-2676: Start of ‘ora.diskmon’ on ‘mysrvr1dr’ succeeded
  • CRS-2676: Start of ‘ora.cssd’ on ‘mysrvr1dr’ succeeded
  • CRS-2672: Attempting to start ‘ora.ctssd’ on ‘mysrvr1dr’
  • CRS-2672: Attempting to start ‘ora.cluster_interconnect.haip’ on ‘mysrvr1dr’
  • CRS-2676: Start of ‘ora.ctssd’ on ‘mysrvr1dr’ succeeded
  • CRS-2676: Start of ‘ora.cluster_interconnect.haip’ on ‘mysrvr1dr’ succeeded
  • CRS-2672: Attempting to start ‘ora.asm’ on ‘mysrvr1dr’
  • CRS-2674: Start of ‘ora.asm’ on ‘mysrvr1dr’ failed
  • CRS-2672: Attempting to start ‘ora.storage’ on ‘mysrvr1dr’
  • ORA-15077: could not locate ASM instance serving a required diskgroup
  • CRS-2674: Start of ‘ora.storage’ on ‘mysrvr1dr’ failed
  • CRS-2679: Attempting to clean ‘ora.storage’ on ‘mysrvr1dr’
  • CRS-2681: Clean of ‘ora.storage’ on ‘mysrvr1dr’ succeeded
  • CRS-2673: Attempting to stop ‘ora.cluster_interconnect.haip’ on ‘mysrvr1dr’
  • CRS-2677: Stop of ‘ora.cluster_interconnect.haip’ on ‘mysrvr1dr’ succeeded
  • CRS-2673: Attempting to stop ‘ora.ctssd’ on ‘mysrvr1dr’
  • CRS-2677: Stop of ‘ora.ctssd’ on ‘mysrvr1dr’ succeeded
  • CRS-4000: Command Start failed, or completed with errors.

## Next attempt ,  whole cluster was down , on first node performed  

  • mysrvr1dr:root:/app/grid/product/12201/grid/bin $ ./crsctl start crs -excl -nocrs
  • ## in this nocrs mode  we were able to start the +ASM1 instance  manually now.
  • SQL> STARTUP PFILE=’/app/oracle/admin/+ASM1/pfile/initASM.ora’;
  • ## Once ASM had started  create the new SPFILE
  • create spfile = ‘+VOTE’ from PFILE=’/app/oracle/admin/+ASM1/pfile/initASM.ora’;
  • ## in Alert noticed this which is good SINCE this shows gpnp profile had been updated accordingly
  • 019-02-08T16:31:32.839547+01:00
  • NOTE: updated gpnp profile ASM SPFILE to
  • NOTE: header on disk 0 advanced to format #2 using fcn 0.0
  • NOTE: header on disk 2 advanced to format #2 using fcn 0.0
  • NOTE: updated gpnp profile ASM diskstring: /dev/mapper/ASM_*
  • NOTE: updated gpnp profile ASM diskstring: /dev/mapper/ASM_*
  • 2019-02-08T16:31:34.381619+01:00
  • NOTE: updated gpnp profile ASM SPFILE to +VOTE/mysrvr18cl/ASMPARAMETERFILE/registry.253.999707493

##### Checked our activities  in ASMCMD:

  • oracle@mysrvr1dr:/app/oracle/admin/+ASM1/pfile [+ASM1]# asmcmd
  • [Option  -p will be used ]
  • ASMCMD [+] > spget
  • +VOTE/mysrvr18cl/ASMPARAMETERFILE/registry.253.999707493

### Checked our activities in gpnptool

oracle@mysrvr1dr:/app/oracle/admin/+ASM1/pfile [+ASM1]# gpnptool get

Warning: some command line parameters were defaulted. Resulting command line:

         /app/grid/product/12201/grid/bin/gpnptool.bin get -o-

<?xml version=”1.0″ encoding=”UTF-8″?><gpnp:GPnP-Profile Version=”1.0″ xmlns=”http://www.grid-pnp.org/2005/11/gpnp-profile” xmlns:gpnp=”http://www.grid-pnp.org/2005/11/gpnp-profile” xmlns:orcl=”http://www.oracle.com/gpnp/2005/11/gpnp-profile” xmlns:xsi=”http://www.w3.org/2001/XMLSchema-instance” xsi:schemaLocation=”http://www.grid-pnp.org/2005/11/gpnp-profile gpnp-profile.xsd” ProfileSequence=”7″ ClusterUId=”afc024ecfd5ffff8ffbeda0a212bebe1″ ClusterName=”mysrvr18cl” PALocation=””><gpnp:Network-Profile><gpnp:HostNetwork id=”gen” HostName=”*”><gpnp:Network id=”net1″ IP=”198.19.11.0″ Adapter=”bond0″ Use=”public”/><gpnp:Network id=”net2″ IP=”192.168.10.0″ Adapter=”eth3″ Use=”asm,cluster_interconnect”/><gpnp:Network id=”net3″ IP=”192.168.11.0″ Adapter=”eth5″ Use=”cluster_interconnect”/></gpnp:HostNetwork></gpnp:Network-Profile><orcl:CSS-Profile id=”css” DiscoveryString=”+asm” LeaseDuration=”400″/><orcl:ASM-Profile id=”asm” DiscoveryString=”/dev/mapper/ASM_*” SPFile=”+VOTE/mysrvr18cl/ASMPARAMETERFILE/registry.253.999707493″ Mode=”remote” Extended=”false”/><ds:Signature xmlns:ds=”http://www.w3.org/2000/09/xmldsig#“><ds:SignedInfo><ds:CanonicalizationMethod Algorithm=”http://www.w3.org/2001/10/xml-exc-c14n#“/><ds:SignatureMethod Algorithm=”http://www.w3.org/2000/09/xmldsig#rsa-sha1“/><ds:Reference URI=””><ds:Transforms><ds:Transform Algorithm=”http://www.w3.org/2000/09/xmldsig#enveloped-signature“/><ds:Transform Algorithm=”http://www.w3.org/2001/10/xml-exc-c14n#“> <InclusiveNamespaces xmlns=”http://www.w3.org/2001/10/xml-exc-c14n#” PrefixList=”gpnp orcl xsi”/></ds:Transform></ds:Transforms><ds:DigestMethod Algorithm=”http://www.w3.org/2000/09/xmldsig#sha1“/><ds:DigestValue>QH9UPO559zhufkrc7tFxQts6oF0=</ds:DigestValue></ds:Reference></ds:SignedInfo><ds:SignatureValue>aL2hOnxyLt5YwMcPjGg8LUDx2KD97Y75eLv+

yqvcfQ5O705K8ceQPCnwnsTs4Wn5E1jNeYCEzXnrVp5zM3hMbz9LdEEP2GKk9XJInQprWc39z7JKxm4uEw

NX3Ocs54FqxP1JdBX7PRiMh/

ePd8CoJIVtIaVMD29giX078uGwXcQ=</ds:SignatureValue></ds:Signature></gpnp:GPnP-Profile>

### since we have started cluster with -excl –nocrs  time to stop the cluster and start it normally

mysrvr1dr:root:/app/grid/product/12201/grid/bin $ ./crsctl stop crs

  • CRS-2791: Starting shutdown of Oracle High Availability Services-managed resources on ‘mysrvr1dr’
  • CRS-2673: Attempting to stop ‘ora.crsd’ on ‘mysrvr1dr’
  • CRS-2677: Stop of ‘ora.crsd’ on ‘mysrvr1dr’ succeeded
  • CRS-2673: Attempting to stop ‘ora.cluster_interconnect.haip’ on ‘mysrvr1dr’
  • CRS-2673: Attempting to stop ‘ora.crf’ on ‘mysrvr1dr’
  • CRS-2673: Attempting to stop ‘ora.drivers.acfs’ on ‘mysrvr1dr’
  • CRS-2673: Attempting to stop ‘ora.gpnpd’ on ‘mysrvr1dr’
  • CRS-2673: Attempting to stop ‘ora.mdnsd’ on ‘mysrvr1dr’
  • CRS-2677: Stop of ‘ora.drivers.acfs’ on ‘mysrvr1dr’ succeeded
  • CRS-2677: Stop of ‘ora.cluster_interconnect.haip’ on ‘mysrvr1dr’ succeeded
  • CRS-2677: Stop of ‘ora.crf’ on ‘mysrvr1dr’ succeeded
  • CRS-2677: Stop of ‘ora.gpnpd’ on ‘mysrvr1dr’ succeeded
  • CRS-2673: Attempting to stop ‘ora.ctssd’ on ‘mysrvr1dr’
  • CRS-2673: Attempting to stop ‘ora.storage’ on ‘mysrvr1dr’
  • CRS-2677: Stop of ‘ora.storage’ on ‘mysrvr1dr’ succeeded
  • CRS-2677: Stop of ‘ora.mdnsd’ on ‘mysrvr1dr’ succeeded
  • CRS-2677: Stop of ‘ora.ctssd’ on ‘mysrvr1dr’ succeeded
  • CRS-2673: Attempting to stop ‘ora.cssd’ on ‘mysrvr1dr’

### starting cluster normally on first node in normal mode

mysrvr1dr:root:/app/grid/product/12201/grid/bin $ ./crsctl start crs

###  Had small issue , so decided to stop the cluster on node 1 with force option

mysrvr1dr:root:/app/grid/product/12201/grid/bin $ ./crsctl stop crs  -f

  • CRS-2791: Starting shutdown of Oracle High Availability Services-managed resources on ‘mysrvr1dr’
  • CRS-2673: Attempting to stop ‘ora.mdnsd’ on ‘mysrvr1dr’
  • CRS-2673: Attempting to stop ‘ora.gpnpd’ on ‘mysrvr1dr’
  • CRS-2677: Stop of ‘ora.mdnsd’ on ‘mysrvr1dr’ succeeded
  • CRS-2677: Stop of ‘ora.gpnpd’ on ‘mysrvr1dr’ succeeded
  • CRS-2673: Attempting to stop ‘ora.ctssd’ on ‘mysrvr1dr’
  • CRS-2673: Attempting to stop ‘ora.evmd’ on ‘mysrvr1dr’
  • CRS-2673: Attempting to stop ‘ora.asm’ on ‘mysrvr1dr’
  • CRS-2673: Attempting to stop ‘ora.drivers.acfs’ on ‘mysrvr1dr’
  • CRS-2677: Stop of ‘ora.drivers.acfs’ on ‘mysrvr1dr’ succeeded
  • CRS-2677: Stop of ‘ora.ctssd’ on ‘mysrvr1dr’ succeeded
  • CRS-2677: Stop of ‘ora.evmd’ on ‘mysrvr1dr’ succeeded
  • CRS-2677: Stop of ‘ora.asm’ on ‘mysrvr1dr’ succeeded
  • CRS-2673: Attempting to stop ‘ora.cluster_interconnect.haip’ on ‘mysrvr1dr’
  • CRS-2677: Stop of ‘ora.cluster_interconnect.haip’ on ‘mysrvr1dr’ succeeded
  • CRS-2673: Attempting to stop ‘ora.cssd’ on ‘mysrvr1dr’
  • CRS-2677: Stop of ‘ora.cssd’ on ‘mysrvr1dr’ succeeded
  • CRS-2673: Attempting to stop ‘ora.gipcd’ on ‘mysrvr1dr’
  • CRS-2677: Stop of ‘ora.gipcd’ on ‘mysrvr1dr’ succeeded
  • CRS-2793: Shutdown of Oracle High Availability Services-managed resources on ‘mysrvr1dr’ has completed
  • CRS-4133: Oracle High Availability Services has been stopped.

#### Time to start the cluster in normal mode for all nodes

mysrvr1dr:root:/root $ cd /app/grid/product/12201/grid/bin

mysrvr1dr:root:/app/grid/product/12201/grid/bin $ ./crsctl start cluster -all

  • CRS-2672: Attempting to start ‘ora.evmd’ on ‘mysrvr6dr’
  • CRS-2672: Attempting to start ‘ora.cssdmonitor’ on ‘mysrvr6dr’
  • CRS-2672: Attempting to start ‘ora.cssdmonitor’ on ‘mysrvr4dr’
  • CRS-2672: Attempting to start ‘ora.cssdmonitor’ on ‘mysrvr2dr’
  • CRS-2672: Attempting to start ‘ora.cssdmonitor’ on ‘mysrvr3dr’
  • CRS-2672: Attempting to start ‘ora.cssdmonitor’ on ‘mysrvr8dr’
  • CRS-2672: Attempting to start ‘ora.evmd’ on ‘mysrvr2dr’
  • CRS-2672: Attempting to start ‘ora.evmd’ on ‘mysrvr4dr’
  • CRS-2672: Attempting to start ‘ora.cssdmonitor’ on ‘mysrvr7dr’
  • CRS-2672: Attempting to start ‘ora.evmd’ on ‘mysrvr3dr’
  • CRS-2672: Attempting to start ‘ora.evmd’ on ‘mysrvr8dr’
  • CRS-2672: Attempting to start ‘ora.evmd’ on ‘mysrvr7dr’
  • CRS-2672: Attempting to start ‘ora.cssdmonitor’ on ‘mysrvr5dr’
  • CRS-2672: Attempting to start ‘ora.evmd’ on ‘mysrvr5dr’
  • CRS-2676: Start of ‘ora.cssdmonitor’ on ‘mysrvr4dr’ succeeded
  • CRS-2676: Start of ‘ora.cssdmonitor’ on ‘mysrvr8dr’ succeeded
  • CRS-2672: Attempting to start ‘ora.cssd’ on ‘mysrvr4dr’
  • CRS-2672: Attempting to start ‘ora.diskmon’ on ‘mysrvr4dr’
  • CRS-2672: Attempting to start ‘ora.cssd’ on ‘mysrvr8dr’
  • CRS-2676: Start of ‘ora.cssdmonitor’ on ‘mysrvr2dr’ succeeded
  • CRS-2672: Attempting to start ‘ora.diskmon’ on ‘mysrvr8dr’
  • CRS-2676: Start of ‘ora.cssdmonitor’ on ‘mysrvr3dr’ succeeded
  • CRS-2676: Start of ‘ora.cssdmonitor’ on ‘mysrvr6dr’ succeeded
  • CRS-2676: Start of ‘ora.cssdmonitor’ on ‘mysrvr7dr’ succeeded
  • CRS-2672: Attempting to start ‘ora.cssd’ on ‘mysrvr2dr’
  • CRS-2672: Attempting to start ‘ora.cssd’ on ‘mysrvr6dr’
  • CRS-2672: Attempting to start ‘ora.diskmon’ on ‘mysrvr2dr’
  • CRS-2672: Attempting to start ‘ora.cssd’ on ‘mysrvr3dr’
  • CRS-2672: Attempting to start ‘ora.diskmon’ on ‘mysrvr6dr’
  • CRS-2672: Attempting to start ‘ora.cssd’ on ‘mysrvr7dr’
  • CRS-2672: Attempting to start ‘ora.diskmon’ on ‘mysrvr3dr’
  • CRS-2676: Start of ‘ora.diskmon’ on ‘mysrvr4dr’ succeeded
  • CRS-2672: Attempting to start ‘ora.diskmon’ on ‘mysrvr7dr’
  • CRS-2676: Start of ‘ora.diskmon’ on ‘mysrvr8dr’ succeeded
  • CRS-2676: Start of ‘ora.diskmon’ on ‘mysrvr2dr’ succeeded
  • CRS-2676: Start of ‘ora.diskmon’ on ‘mysrvr6dr’ succeeded
  • CRS-2676: Start of ‘ora.diskmon’ on ‘mysrvr3dr’ succeeded
  • CRS-2676: Start of ‘ora.diskmon’ on ‘mysrvr7dr’ succeeded
  • CRS-2676: Start of ‘ora.cssdmonitor’ on ‘mysrvr5dr’ succeeded
  • CRS-2672: Attempting to start ‘ora.cssd’ on ‘mysrvr5dr’
  • CRS-2672: Attempting to start ‘ora.diskmon’ on ‘mysrvr5dr’
  • CRS-2676: Start of ‘ora.diskmon’ on ‘mysrvr5dr’ succeeded
  • CRS-2676: Start of ‘ora.evmd’ on ‘mysrvr6dr’ succeeded
  • CRS-2676: Start of ‘ora.evmd’ on ‘mysrvr2dr’ succeeded
  • CRS-2676: Start of ‘ora.evmd’ on ‘mysrvr4dr’ succeeded
  • CRS-2676: Start of ‘ora.evmd’ on ‘mysrvr8dr’ succeeded
  • CRS-2676: Start of ‘ora.evmd’ on ‘mysrvr3dr’ succeeded
  • CRS-2676: Start of ‘ora.evmd’ on ‘mysrvr7dr’ succeeded
  • CRS-2676: Start of ‘ora.evmd’ on ‘mysrvr5dr’ succeeded
  • CRS-2676: Start of ‘ora.cssd’ on ‘mysrvr8dr’ succeeded
  • CRS-2672: Attempting to start ‘ora.ctssd’ on ‘mysrvr8dr’
  • CRS-2672: Attempting to start ‘ora.cluster_interconnect.haip’ on ‘mysrvr8dr’
  • CRS-2676: Start of ‘ora.cssd’ on ‘mysrvr2dr’ succeeded
  • CRS-2672: Attempting to start ‘ora.ctssd’ on ‘mysrvr2dr’
  • CRS-2672: Attempting to start ‘ora.cluster_interconnect.haip’ on ‘mysrvr2dr’
  • CRS-2676: Start of ‘ora.cssd’ on ‘mysrvr5dr’ succeeded
  • CRS-2672: Attempting to start ‘ora.ctssd’ on ‘mysrvr5dr’
  • CRS-2672: Attempting to start ‘ora.cluster_interconnect.haip’ on ‘mysrvr5dr’
  • CRS-2676: Start of ‘ora.ctssd’ on ‘mysrvr8dr’ succeeded
  • CRS-2676: Start of ‘ora.ctssd’ on ‘mysrvr2dr’ succeeded
  • CRS-2676: Start of ‘ora.cssd’ on ‘mysrvr7dr’ succeeded
  • CRS-2672: Attempting to start ‘ora.ctssd’ on ‘mysrvr7dr’
  • CRS-2672: Attempting to start ‘ora.cluster_interconnect.haip’ on ‘mysrvr7dr’
  • CRS-2676: Start of ‘ora.ctssd’ on ‘mysrvr5dr’ succeeded
  • CRS-2676: Start of ‘ora.cssd’ on ‘mysrvr4dr’ succeeded
  • CRS-2672: Attempting to start ‘ora.ctssd’ on ‘mysrvr4dr’
  • CRS-2672: Attempting to start ‘ora.cluster_interconnect.haip’ on ‘mysrvr4dr’
  • CRS-2676: Start of ‘ora.cssd’ on ‘mysrvr3dr’ succeeded
  • CRS-2676: Start of ‘ora.cssd’ on ‘mysrvr6dr’ succeeded
  • CRS-2672: Attempting to start ‘ora.ctssd’ on ‘mysrvr3dr’
  • CRS-2672: Attempting to start ‘ora.cluster_interconnect.haip’ on ‘mysrvr3dr’
  • CRS-2672: Attempting to start ‘ora.ctssd’ on ‘mysrvr6dr’
  • CRS-2672: Attempting to start ‘ora.cluster_interconnect.haip’ on ‘mysrvr6dr’
  • CRS-2676: Start of ‘ora.ctssd’ on ‘mysrvr7dr’ succeeded
  • CRS-2676: Start of ‘ora.cluster_interconnect.haip’ on ‘mysrvr8dr’ succeeded
  • CRS-2672: Attempting to start ‘ora.asm’ on ‘mysrvr8dr’
  • CRS-2676: Start of ‘ora.asm’ on ‘mysrvr8dr’ succeeded
  • CRS-2672: Attempting to start ‘ora.storage’ on ‘mysrvr8dr’
  • CRS-2676: Start of ‘ora.ctssd’ on ‘mysrvr4dr’ succeeded
  • CRS-2676: Start of ‘ora.ctssd’ on ‘mysrvr3dr’ succeeded
  • CRS-2676: Start of ‘ora.ctssd’ on ‘mysrvr6dr’ succeeded
  • CRS-2676: Start of ‘ora.cluster_interconnect.haip’ on ‘mysrvr2dr’ succeeded
  • CRS-2672: Attempting to start ‘ora.asm’ on ‘mysrvr2dr’
  • CRS-2676: Start of ‘ora.asm’ on ‘mysrvr2dr’ succeeded
  • CRS-2672: Attempting to start ‘ora.storage’ on ‘mysrvr2dr’
  • CRS-2676: Start of ‘ora.storage’ on ‘mysrvr8dr’ succeeded
  • CRS-2672: Attempting to start ‘ora.crsd’ on ‘mysrvr8dr’
  • CRS-2676: Start of ‘ora.crsd’ on ‘mysrvr8dr’ succeeded
  • CRS-2676: Start of ‘ora.storage’ on ‘mysrvr2dr’ succeeded
  • CRS-2672: Attempting to start ‘ora.crsd’ on ‘mysrvr2dr’
  • CRS-2676: Start of ‘ora.cluster_interconnect.haip’ on ‘mysrvr5dr’ succeeded
  • CRS-2672: Attempting to start ‘ora.asm’ on ‘mysrvr5dr’
  • CRS-2676: Start of ‘ora.asm’ on ‘mysrvr5dr’ succeeded
  • CRS-2672: Attempting to start ‘ora.storage’ on ‘mysrvr5dr’
  • CRS-2676: Start of ‘ora.crsd’ on ‘mysrvr2dr’ succeeded
  • CRS-2676: Start of ‘ora.storage’ on ‘mysrvr5dr’ succeeded
  • CRS-2672: Attempting to start ‘ora.crsd’ on ‘mysrvr5dr’
  • CRS-2676: Start of ‘ora.cluster_interconnect.haip’ on ‘mysrvr7dr’ succeeded
  • CRS-2672: Attempting to start ‘ora.asm’ on ‘mysrvr7dr’
  • CRS-2676: Start of ‘ora.asm’ on ‘mysrvr7dr’ succeeded
  • CRS-2672: Attempting to start ‘ora.storage’ on ‘mysrvr7dr’
  • CRS-2676: Start of ‘ora.crsd’ on ‘mysrvr5dr’ succeeded
  • CRS-2676: Start of ‘ora.storage’ on ‘mysrvr7dr’ succeeded
  • CRS-2672: Attempting to start ‘ora.crsd’ on ‘mysrvr7dr’
  • CRS-2676: Start of ‘ora.cluster_interconnect.haip’ on ‘mysrvr6dr’ succeeded
  • CRS-2672: Attempting to start ‘ora.asm’ on ‘mysrvr6dr’
  • CRS-2676: Start of ‘ora.asm’ on ‘mysrvr6dr’ succeeded
  • CRS-2672: Attempting to start ‘ora.storage’ on ‘mysrvr6dr’
  • CRS-2676: Start of ‘ora.cluster_interconnect.haip’ on ‘mysrvr4dr’ succeeded
  • CRS-2672: Attempting to start ‘ora.asm’ on ‘mysrvr4dr’
  • CRS-2676: Start of ‘ora.asm’ on ‘mysrvr4dr’ succeeded
  • CRS-2672: Attempting to start ‘ora.storage’ on ‘mysrvr4dr’
  • CRS-2676: Start of ‘ora.cluster_interconnect.haip’ on ‘mysrvr3dr’ succeeded
  • CRS-2672: Attempting to start ‘ora.asm’ on ‘mysrvr3dr’
  • CRS-2676: Start of ‘ora.asm’ on ‘mysrvr3dr’ succeeded
  • CRS-2672: Attempting to start ‘ora.storage’ on ‘mysrvr3dr’
  • CRS-2676: Start of ‘ora.crsd’ on ‘mysrvr7dr’ succeeded
  • CRS-2676: Start of ‘ora.storage’ on ‘mysrvr6dr’ succeeded
  • CRS-2672: Attempting to start ‘ora.crsd’ on ‘mysrvr6dr’
  • CRS-2676: Start of ‘ora.storage’ on ‘mysrvr4dr’ succeeded
  • CRS-2672: Attempting to start ‘ora.crsd’ on ‘mysrvr4dr’
  • CRS-2676: Start of ‘ora.storage’ on ‘mysrvr3dr’ succeeded
  • CRS-2672: Attempting to start ‘ora.crsd’ on ‘mysrvr3dr’
  • CRS-2676: Start of ‘ora.crsd’ on ‘mysrvr6dr’ succeeded
  • CRS-2676: Start of ‘ora.crsd’ on ‘mysrvr4dr’ succeeded
  • CRS-2676: Start of ‘ora.crsd’ on ‘mysrvr3dr’ succeeded
  • CRS-4690: Oracle Clusterware is already running on ‘mysrvr1dr’ à fine since  we kept cluster running on node 1

CRS-4000: Command Start failed, or completed with errors.

### checks performed :

On each node: ps -ef|grep d.bin

On each node: crsctl stat res -t -init

On a node: crsctl check cluster -all

Happy reading,

And till next time

Mathijs